Building a home-made solar dryer can dramatically improve the way you preserve fruits, vegetables and herbs. By harnessing renewable energy, you can achieve efficient dehydration while maintaining the nutritional value of your crops. In this guide, you will find practical tips on design, materials selection, assembly and day-to-day operation of a simple and cost-effective solution for small-scale farming or home gardening.
Understanding the Benefits of a Solar Dryer
Before diving into construction, it is important to recognize the advantages of a DIY solar dryer:
- Sustainable preservation: Unlike electric dehydrators, solar dryers rely on sunlight, reducing greenhouse gas emissions and long-term energy bills.
- Enhanced flavor retention: Slow drying at moderate temperature preserves essential oils, flavor compounds and vitamins.
- Improved food safety: Controlled airflow and ventilation limit mold growth and bacterial contamination.
- Year-round usage: Even in cooler months, passive solar heat can be harnessed with proper insulation.
- Durable construction: Well-built units can last for years with minimal maintenance.
Materials and Tools Needed
Gathering the right components before starting ensures a smooth build. Below is a list of essential materials, along with recommended tools:
Materials
- Wooden frame components (untreated pine or cedar planks): for the main box structure.
- Clear polycarbonate or tempered glass sheet: to serve as the solar collector cover.
- Aluminum or black-painted metal sheet: as the absorber plate that collects heat.
- Wire mesh trays or food-grade mesh screens: for placing the produce.
- Foam board or mineral wool insulation: to reduce heat loss on sides and bottom.
- Weatherproof sealant and wood screws: for airtight assembly.
- Small computer fan or passive air vents: to enhance ventilation if necessary.
- Hinges and latches: for access doors and adjustable vents.
Tools
- Circular saw or handsaw: to cut wooden planks to size.
- Power drill with screwdriver bits.
- Tape measure and carpenter’s square: for accurate measurements.
- Clamps: to hold components in place during assembly.
- Paintbrush and black heat-resistant paint.
- Caulking gun: to apply sealant neatly.
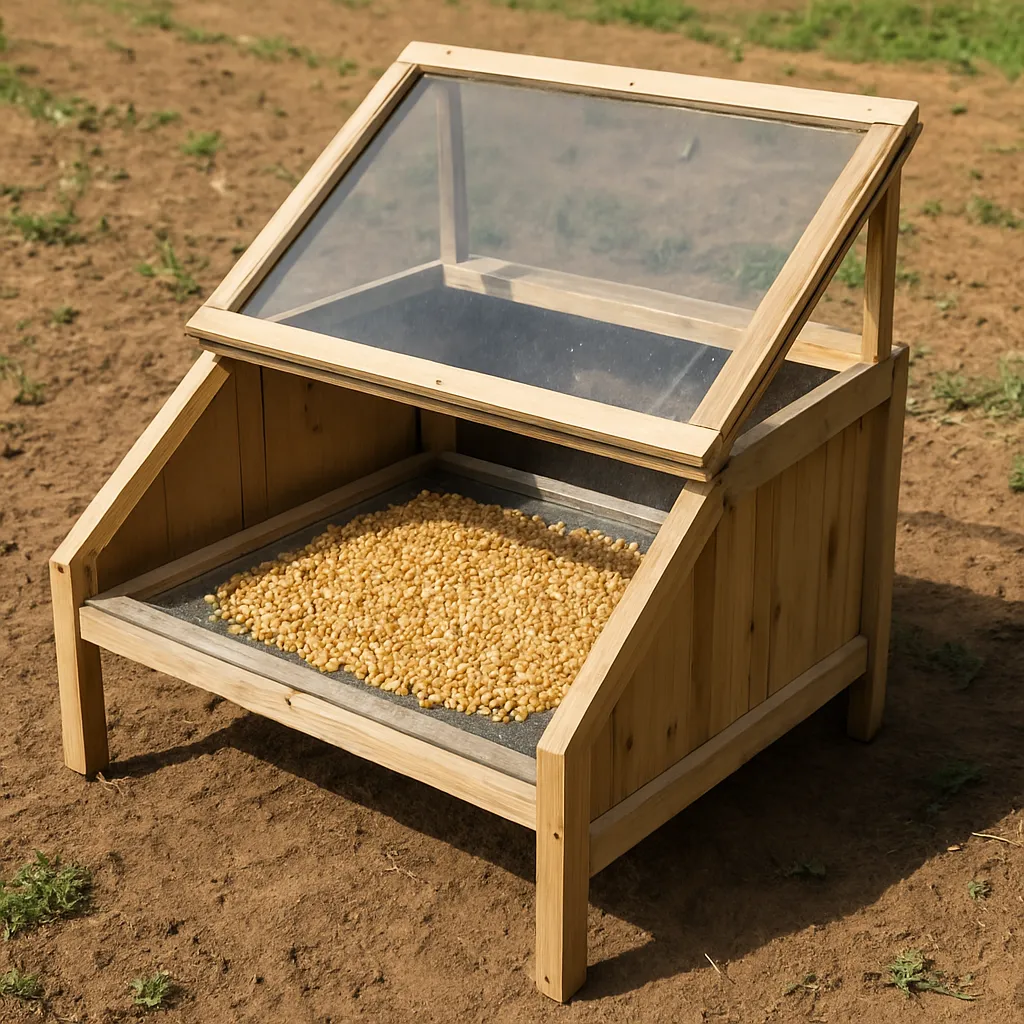
Step-by-Step Construction Guide
1. Building the Outer Frame
Start by constructing a rectangular box from the wooden planks. A typical size for small-scale use is 1.2 m long x 0.6 m wide x 0.4 m deep. Ensure corners are square and joints are tight to maintain insulation integrity.
- Cut four side planks and secure them using wood screws, pre-drilling pilot holes to prevent splitting.
- Attach a bottom panel to the frame; reinforce the interior with wooden battens if heavy loads are expected.
2. Insulating the Interior
Proper insulation is crucial to maintain elevated temperatures and promote even drying:
- Line the bottom and sidewalls with foam board or mineral wool, fitting pieces snugly.
- Seal all gaps with weatherproof sealant. This prevents heat escape and deters moisture infiltration.
- If using mineral wool, cover it with a breathable fabric to prevent fibers from contaminating food.
3. Installing the Absorber Plate
The absorber plate is the heart of your dryer, converting solar radiation into heat energy:
- Paint the metal sheet matte black on one side using heat-resistant paint. Black surfaces absorb more solar radiation.
- Place the painted side up inside the insulated box. Elevate it slightly using small spacers to allow airflow underneath.
4. Adding the Transparent Cover
This cover creates a greenhouse effect, trapping heat:
- Cut the polycarbonate or tempered glass to fit the top of the box, ensuring at least a 1 cm overhang on all sides.
- Mount the cover using hinges on one side for easy access, and secure the opposite side with latches.
- Apply sealant around the edges to achieve an airtight enclosure, while still allowing for periodic vent adjustments.
5. Ventilation System
Effective air circulation removes moisture-laden air from the dryer:
- Drill intake vent holes near the bottom front of the box, fitting adjustable louvers or a simple flap mechanism.
- Create exhaust vents at the top back of the box; consider adding a thermostatically controlled fan for consistent airflow on cloudy days.
6. Tray Installation
Proper tray placement ensures uniform drying without cross-contamination:
- Install horizontal support rails inside the box to hold mesh trays. Spacing of 8–10 cm allows adequate airflow between trays.
- Use food-grade mesh screens or stainless-steel trays. Avoid plastic materials that may off-gas at higher temperatures.
Operation and Maintenance Tips
Optimal Loading and Drying Practices
- Slice produce uniformly (2–5 mm thickness) to guarantee even drying times.
- Arrange items in a single layer without overlap for maximum exposure to heat and airflow.
- Start the drying process early in the morning. Adjust vents to maintain internal temperatures between 45–65 °C depending on the type of crops.
Monitoring and Safety
Regular checks are essential:
- Use a digital thermometer to monitor temperature and humidity levels inside the chamber.
- Inspect seals and hinges for wear, reapplying sealant or tightening screws as needed.
- Perform daily visual inspections for signs of mold or uneven dehydration spikes.
Cleaning and Hygiene
Maintaining hygiene ensures food safety and prolongs equipment life:
- Remove trays after each batch and wash with warm soapy water. Sanitize if processing high-sugar fruits prone to fermentation.
- Wipe down the absorber plate and interior walls periodically to remove dust and debris.
- Check mesh screens for tears or sagging; replace any compromised trays to prevent contamination.
Seasonal Adjustments and Storage
To maximize performance across seasons:
- In cooler months, add an external reflective panel around the south-facing side to boost sunlight capture.
- Use a detachable cover or insulated blanket during evenings to retain residual heat.
- When not in use, store the dryer in a sheltered area or under a waterproof tarp to protect wood and glass components.
Maximizing Efficiency and Scalability
As your needs grow, consider these enhancements:
- Modular expansion: Add more boxes side-by-side to increase capacity without redesigning the entire system.
- Automated controls: Integrate solar-powered sensors to adjust vent openings and fan speed based on real-time ventilation requirements.
- Hybrid model: Combine solar drying with low-wattage electric backup to ensure reliability during extended cloudy periods.
By following these guidelines, you can create a robust, low-cost solar dryer that transforms seasonal harvests into shelf-stable, nutrient-rich food products. With proper construction, operation and care, your DIY solar dryer will be a valuable asset for sustainable, home-based food preservation.